How to Use a Digital (or Paper) Planner
When it comes to using a planner, you really should go “back to the future.”
We get lots of questions from our clients about how to use a digital planner. To be successful with a digital planner, it’s critical to employ the basics of a paper planner.

Paper vs Digital Planners
We still stand by using a physical planner. Why?
Hard-copy planners provide a better monthly and weekly view. This is key to stay on track week-to-week.
Recording in physical planners is more
Also, research shows that writing with a pen/pencil activates the regions of our brain that manage thinking and planning. Typing with finger tips only activates the “language” areas of our brain.
We explain additional reasons in more detail in our article, Smart Phones vs Planners.
A Simple & Efficient Digital Planner System
While we recommend using a paper planner, we know some students are required to or insist on going digital. As long as the system is simple and efficient, we support it.
Our system for using a planner is applicable to any digital calendar app/website. Our favorite is the Google Calendar. But, most all calendar apps can be used.
Four Critical Moments to Use Your Planner
There are some obvious times you should use your planner. For example, scheduling an appointment or a meeting.
In addition, there are four critical times you should use your
Anchor Point 1: New Year, New Semester, New Season
The first phase of maintaining a planner is to enter all known and repeating dates, these are usually established at the beginning of each new school year, semester, or season.
These can be things such as:
- Sports practices and games
- Holidays
- Days off school
- Key school events (i.e. Prom, ACT/SAT testing)
- Work schedule (as soon as you receive it)
Do this at the beginning of the school year, semester, or extracurricular season. The earlier you put these events in your planner, the better. It may take time to set this up, but the benefits are worth it! You’ll always know what’s going on rather than feeling in the dark.
Anchor Point 2: Sundays
The Sunday Meeting is a 5-10 minute activity that family members hold together to review everyone’s schedule for the upcoming week. This time is used to get everyone on the same page. If there are schedule conflicts, it can be addressed during this time.
Click here to learn more details about how to setup and run your Sunday Meeting.
Anchor Point 3: In Class
As soon as you receive a calendar or syllabus, enter: key dates, large assignments, projects, tests, and final exams in your planner.
In class, assignments should be entered in a digital (or paper) planner as soon as they are assigned. Just be careful to not get distracted by other apps and messages.
The following steps outline how to enter school-work in a digital planner:
- Select the due date/time.
- Enter the event title using abbreviations. This title should identify: the class subject, type of assignment, and materials needed. (See recommended abbreviations below.)
- Add the details of the assignment to the details/notes section. This can be the page numbers, problem numbers, the handout referenced, etc.
- Add guests, if appropriate. This could be project team-members on a project or your parents.
When using a digital planner, it’s important to minimize the number of characters in an event title. In certain views, event titles can be limited to as little as eight characters. Using abbreviations allows you to view a lot of information in a small amount of space.
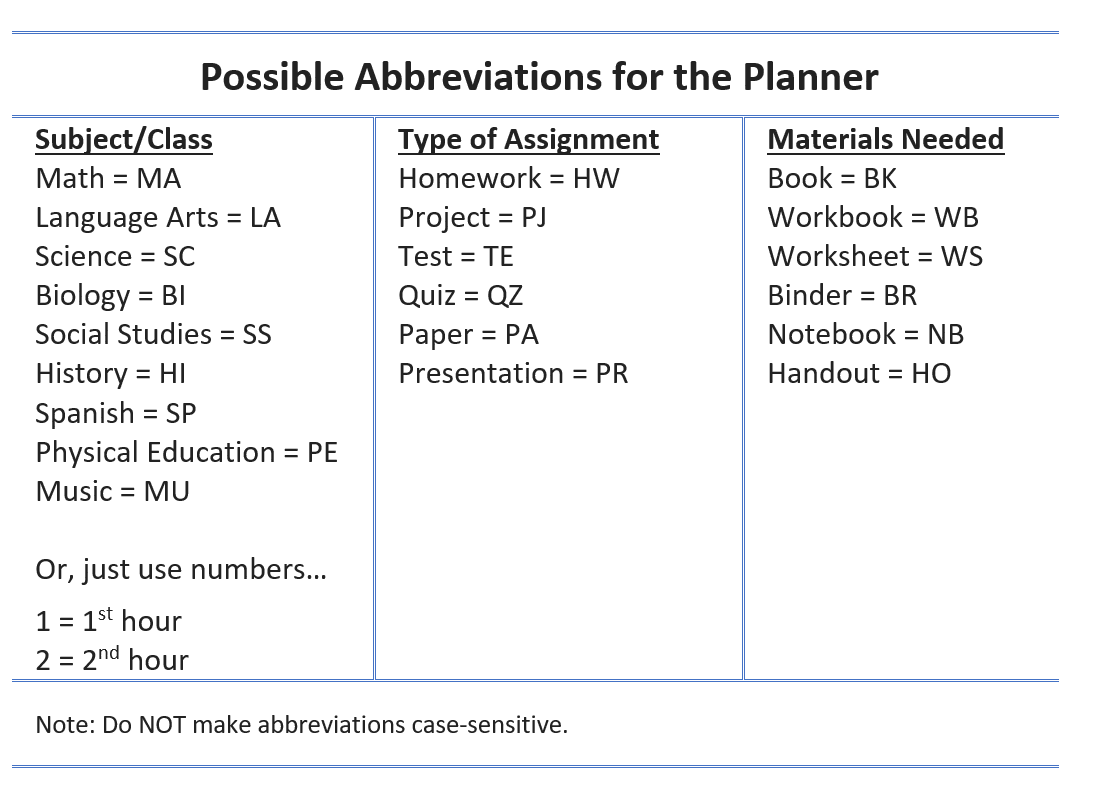
We recommend setting up event titles in the following format:
Subject/Class – Type of Assignment – Materials Needed (Example: MA-HW-BK)
The following are the abbreviations we recommend:
Anchor Point 4: Getting Ready for “After School”
Pulling it Together
Having a simple and efficient planner system is a key to being a successful student.
Do you want to learn more about our planner system and the other systems we teach to help students stay better organized? Check out our SOAR Learning & Soft Skills App, here.
Six Steps
Conquer the Chaos
Get Our Free Guide & Information on...
 How to Organize & Motivate Students for Success
"*" indicates required fields
Get Our FREE Curriculum Guide!

The SOAR® Curriculum

The most critical learning, organizing, and communication skills needed for school. Learn more here.
Who’s Using SOAR®?

SOAR® Guarantee

Click here to learn more.